
2011 has come and gone and I still have catching up to do on the blogging. I know, I'm really bad at this. Ideally, I would keep up with the photos and blogging, but if it's any consolation, it's one of my New Year's Resolutions. Since I have a multitude of posts backing up, I have decided that in an effort to save time and get up to day, I will yet again condense many of these escapades and recipes. Once again, I ask that my audience, if I have any left, will forgive this seemingly lazy approach, and enjoy the many colourful photos and meals.
This photo doesn't have a post to go with it, but a simple reminder: don't underestimate the egg. Omelets are a perfectly easy, simply, tasty and filling dinner. They are often a staple in our busy household and my husband is particularly fond of them. Versatility is their name and an unimaginable number of combinations can be created simply by changing the veggies, protein, herbs, spices and add-ins for the omelet. Omelets also lend themselves as wonderful vehicles to using up leftovers. In our case, this simple dinner helped empty some bits and bites from the fridge as well as satisfy our grumbling tummies. A couple of eggs, some liquid egg whites scrambled up with a whisk, topped with finely diced red, yellow and orange peppers and a sprinkling of fresh dill made a filling dinner for two.
 |
| omelet for 2 |
* * * * *
I often find my collection of "make-soon" recipes piling up I as I lack the time or ingredients to dive right in when I have found them. One recipe that I found in a Chatelaine magazine for a potato casserole bake was finally about to come to fruition since we had received a vegetable box from C's cousin's kid's school which included a bag of potatoes. As well, I had been wanting to try making caramelized onions and stuffing them into mushrooms as I had seem a picture of this either on a food blog or a magazine at the gym.
Patience inevitably pays off and 2 more recipes to try were knocked off the list.
Potatoes are the first thing to be prepped for this casserole. Each one received a good scrubbing to remove any dirt and hopefully pesticides then they were diced up.
 |
| potatoes, scrubbed and ready |
 |
| potatoes cut into small chunks |
Also mixed into the casserole are diced red peppers, green onions, and broccoli (not shown). The broccoli was a leftover that needed to be used up, the other items were purchased for this recipe.
 |
| red pepper and green onions, chopped and ready to go |
The filling, or binder, for this casserole was leftover cottage cheese, shredded cheese, and egg. The chopped veggies were mixed together and put into a greased 9x9" pan, then the filling was poured overtop and the whole thing baked until set.
 |
| chopped broccoli and cheese mixture added to casserole |
For the veggie portion of the dinner (somehow, I viewed the casserole as more of the main/carb part of the meal) I wanted to make the onion stuffed mushrooms. I sliced rounds out of some yellow onions that had come in the produce box and sprinkled them into pan with melted butter over low/medium heat to slowly cook the onions to a golden brown hue without burning them. This process was supposed to take 30 minutes of a watchful eye and frequent stirring. I was as patient as I could be that day, but should have likely been even more so as the onions browned a little too fast.
 |
| slowly cooking onions |
Again, using up leftovers is something that I consider to be a fun challenge in this household: let nothing go to waste! If you have never seen the British documentary about a modern family taking on the challenge of living in wartime Britain circumstances, I would highly recommend sitting down to watch "The 1940s House". This film takes the family through a waste-not-want-not era of backyard gardens, rations on food, and using up every scrap of food. Watching the family adapt and grow closer is fascinating and inspiring! I definitely appreciate the effort and creativity that goes into using up food scraps and leftovers before they spoil.
But, I digress, back to the onions! I added in the last of the leftover dry crumbled feta and sprinkled in some rosemary and chopped garlic.
 |
| onion with feta and herbs |
Mmm, the hot potato casserole came out of the oven nicely browned and smelling hearty and comforting.
 |
| potato casserole |
While the potato casserole was baking, I plucked the mushroom stems from the giant caps and piled the onion mixture inside, stuffing them as full as I could. I put them on a tray and stuck them in the oven to cook the mushrooms until tender while the casserole finished. Some frozen peas steamed while I waited for the oven timer to go off for the rest of dinner. With the binging of the oven and microwave timer, everything was hot and ready at the same time and a colourful healthy dinner was ready.
 |
| vegetarian dinner |
* * * * *
While I do cook a lot of vegetarian dinners, I find that in the colder weather, I often crave a hearty, meaty piping hot beef stew. I picked up a couple of small packages of beef stewing cubes at Safeway and left one in the fridge and tucked one away in the freezer for another use. My beef stew recipe is a modified version of a Canadian Living magazine version. If you wish to make this recipe, it's best to have an already opened bottle of red wine that needs to be used up, or just pick up a cheaper bottle of rich red wine from the store for this meal. Some wine for the stew and some in a glass with dinner: perfect date material.
First things first, pat the meat dry. Damp meat won't brown properly. I remember this from the Julie and Julia movie.
 |
| stewing beef, being patted dry with paper towel |
While stewing meat already comes cubed, I like to cut the huge chunks into more manageable bite-sized pieces. I also like to cut off any excess fat from the sides of the pieces. While the marbling of the cuts are what will give the meat flavour and tenderness during the cooking process, I don't like leaving on additional fat/gristle from the edges. Before the meat gets browned in the cast iron pot, it needs to be dredged in flour. The flour that sticks to the bottom of the pan while browning is what's going to make the thickened gravy part of the stew when the pan gets de-glazed. One way to coat the beef in flour is to put some of the white stuff into a bowl, dredge the meat in, then shake off the excess and place the finished chunk into a bowl until each of the pieces are coated. An easier way to do this is the Shake-N-Bake method of placing flour into a clean bag (I save the bags that I purchase smooth bulk products like nuts for later uses), dump in the meat, and shake until everything is coated. Easy.
 |
| coating the meat in flour for browning |
The meat is now ready for browning. I would like to interject that stew is definitely a process to make but consider it a time of personal reflection and a spiritual experience. I know that idea sounds really corny but think about the slow, thoughtful process involved to make the perfect stew. The transformation of a tough, discard of meat that given enough time and love, will become a tender chunk of delectable dinner. Take your time, enjoy the process, remember that patience is a virtue and that good things come to those who wait. The tantalizing aroma from the cooking stew will be your assurance of your reward.
Add some mild tasting oil to the pan and heat until a drop of water into it sputters. Medium heat will do. Use clean tongs to carefully place the beef chunks into the oil and quickly turn the chunks until each side is browned. Once the pieces are browned, remove from the pan and place in a bowl off to the side for later use. Browning is what seals in the juices of the meat during the stewing process and helps make the meat tender and tasty. Do not skip this process, do not rush the browning, and do not crown the meat. Only brown a few pieces at a time, adding more oil throughout the process if necessary.
 |
| browning meat |
 |
| bowl of browned meat |
Once all of the meat has been carefully browned, it is time for the fun part of de-glazing the pan. This process involves adding a flavoured liquid to the pan of stuck-on cooked flour and meat juices, and scraping those bits off the bottom of the pot. In this case, I added in some butter and lots of chopped garlic, as well as about a tablespoon or a little more of sugar (white, but you could use brown as well). Once the butter is melted and slightly golden, and the sugar cooking, I use a whisk to mix everything up and scrape the bottom of the pot. Next, I added in about 1/4 to 1/2 cup of red wine, 1/4-1/2 cup of water, and about 3 or more cups of beef stock.
 |
| adding in the wine to de-glaze the pot |
 |
| heat the liquid in the pot to absorb flavour |
While the meat rests and the stew liquid simmers, I toke some time to chop up the stew veggies. Be sure to use a different cutting board or clean it well after cutting up the beef to avoid any cross-contamination. I had actually chopped up the veggies the day before and simply put them in tupperware containers to save a bit of time on stew-day. Potatoes, mushrooms and carrots are ready to be added to the pot. I don't add in my veggies with the meat as I find they get too soft if they cook for as long as the meat does. Also, I often add a cup of frozen peas to the last 15 minutes of the stew, right before serving so they are bright and crisp. Once again, feel free to tailor this recipe to your taste. Sweet potatoes could be used, another type of mushroom, parsnip, turnip... Add these about an hour before serving. Before adding in the veggies, season your stew to taste. I use salt, pepper, a bay leaf, and some thyme.
 |
| stew add-ins |
With everything now added into the pot, the stew is brought to a boil and then the heat reduced to simmer with the lid on. With only patience required to finish dinner, lunch is on the menu while I waited! While picking up packs of beef, I also grabbed some sole on sale. I'll occasionally purchase reduced price meat or fish if I am cooking it that day. I patted the fillets dry and sliced up one potato on our mini-mandoline (this creates paper-thin chips, perfect for a quick fry).
 |
| sole fillet |
The thinly sliced potato was added to a pre-heated pan with some olive oil for a quick crisp-fry.
 |
| thinly sliced potatoes frying until crisp |
With the potato chips cooling on a piece of paper towel to soak up any excess oil, I threw a serving of quinoi into a pot with water and chopped dried apricot.
 |
| cooling chips |
The sole was lightly coated in cornmeal and pan fried while the quinoi cooked. With a light lunch like this, timing is everything. Try to cook everything in an order that allows each portion to be hot (or cold, depending on what suits the dish) at the same time...this takes practice but it makes the meal more enjoyable. Learn to multitask in the kitchen.
 |
| cornmeal crusted pan-fried sole |
Lunch is served! Cornmeal crusted sole, potato chips with ketchup, and a spring mix salad with tomatoes and cucumber.
 |
| lunch is served |
Lunch has been enjoyed and dinner will be ready for whenever we feel like eating. Don't forget to add in the peas before serving!
 |
| stew, done |
Since the there was enough sole for two meals, the next day's lunch was easy. The quinoi with apricot simply had chopped cilantro, lemon infused oil, and fresh cracked sea salt mixed in for a side. Some simply sauteed cauliflower with feta dressing and the meal was done.
 |
| lunch the next day |
* * * * *
Another dinner of using up leftovers. Out with the old, in with the new, as far as groceries go. While making one meal, I often like to cook another dish at the same time, especially if the oven is already on for something to save on energy. The oven was already cooking up some cubed sweet potatoes with oil in our cast iron skillet so this would work out well to roast some squashy tomatoes and a spaghetti squash that C brought home on a whim.
 |
| roasting sweet potato |
Cutting a spaghetti squash in half is a little bit scary since the uncooked flesh is rather sturdy and plunging a knife in and wiggling it around with pressure gives me shivers thinking about a slip and lost fingers. However, slow and steady wins the race. Once the vegetable's halved, the seeds and insides can be scrapped out with a spoon. A quick spray with Pam on the cut side, cut side down on parchment paper on a baking sheet and into the oven for about an hour until the meat is soft.
 |
| seeding butternut squash |
One more baking sheet in the oven holds the quickly turning tomatoes, seasoned with some dried basil, oregano, salt and pepper. I really just wanted to roast these until some of the flavour was released from the fruit.
 |
| roasted tomatoes |
In a saucepan, I started cooking down some mushrooms.
 |
| cooking mushrooms |
The roasted tomatoes went into the saucepan with some leftover wine for an Italian inspired topping to some beef cutlets that needed to be used up.
 |
| Tomato and mushroom ragu |
The entire dinner consisted of the roasted sweet potato (carb), breaded and pan fried beef cutlet topped with the ragu (protein and veggie), and a side salad of spring mix, raw broccoli, and cherry tomatoes (veg).
 |
| a complete dinner |
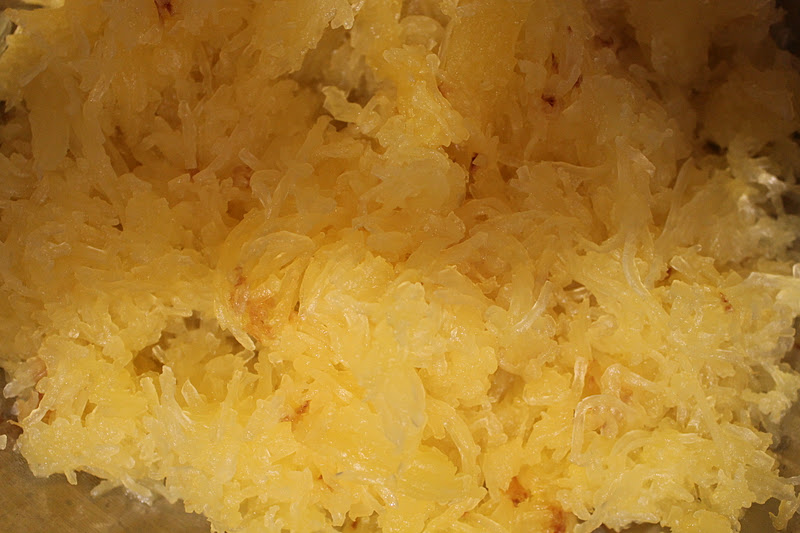
Dinner's been eaten and the spaghetti squash finished baking. A fork easily slid into the flesh so it was ready to be scraped into "spaghetti". To remove the flesh, take a strong fork and scrape the inside of the squash with the prongs, in long, even strokes. The squash will come out of it's hard shell in strands. Continue to scrape down the squash until all of the soft meat in removed from the vessel.
 |
| spaghetti squash cooked and ready to be stranded |
When the scrapping is done, all that's left is a firm shell, like a giant nut with the meat removed.
 |
| squash shell |
The spaghetti squash strands went into a bowl as I scrapped out each forkful.
 |
| spaghetti squash strands |
With the spaghetti squash cooling in the bowl, it was time to cook up some chopped onion and swiss chard.
 |
| sauteed onion with swiss chard |
All of the cooked veggies can be added together now.
 |
| sauteed veggies |
To make the sauce for the veggies, mix together 1/2 cup each of light sour cream, light Parmesan cheese, and fat free cottage cheese with one beaten egg, salt and pepper.
 |
| spaghetti squash and chard gratin sauce |
After the veggies and cheese mixture are combined and placed into a greased squash pan, the gratin can be baked at 400 F for 30-40 minutes or packaged up and frozen for another time. I made 2 and baked one for a lunch, and froze the other for later. Whenever I freeze a batch of something, I'm careful to write on the foil what the dish is and how to reheat it so that I'm not fumbling around looking for the recipe when I feel like making it.
 |
| one for eating, one for later |
This gratin is creamy, healthy, and very tasty. This is a hearty side dish, best served hot. I believe it would be a great crowd-pleaser.
 |
| baked gratin |
The gratin was served with a fresh sliced tomato, half a sauteed zucchini, and an egg and egg white scramble.
 |
| fresh and healthy meal |
* * * * *
C invited his friends over for dinner one night. They recently tied the knot and were expecting their first child together: exciting! We wanted to get together to catch up and celebrate their wonderful news. Since they mostly eat vegetarian meals, C wanted to make the vegetarian chili that we do as it's once if his favorites. At my grandparent's place, The Food Network was on and it might have been Diners, Drive-Ins and Dives, but I watched a chili being poured over a corn waffle. Corn waffles! Brilliant! Cornbread seemed so boring after I saw this recipe idea. I was now determined to create this dish. I looked up some waffle recipes to see if I could find anything online and I did. I mixed up the thick cornmeal batter and poured it into the hot oiled waffle maker.
 |
| cornbread waffles |
Unfortunately, C's friend's wife ended up working the night of the dinner so she wasn't able to make it. We decided to just keep things simple for dinner. We made up bowls of toppings for the chili...chopped cilantro, shredded cheese, sour cream and then put everything on the table as a DIY dinner. The meal was fantastic and filling, we had a great visit, and I sent our friend home with a take-home tupperware of chili and some wrapped up waffles for his wife when she got back from work. Friends are precious. Remember to be thankful for them and enjoy their company often.
 |
| cornbread waffles with vegetarian chili, and toppings |
No comments:
Post a Comment